What kind of install can be done in bare feet and a swim suit? An easy one, that’s for sure and that’s exactly what this LilliPad Diving Board is all about. Houseboat magazine first took notice of this diving board after it received the coveted 2015 Innovation Award at the Miami International Boat Show last year. Today this high-quality aftermarket product is continuing to take the pontoon industry by storm. While it’s not designed just for pontoon boats, the inspiration did come out of a pontoon necessity. Inventor Corey Schaub first got the idea after he attempted to mock up something for his in-law’s pontoon boat to keep his kids entertained while they were visiting. Several prototype models later, Corey came up with the only pontoon diving board in the industry.
Since its debut, it has become the must-have add-on for a lot of boaters and as this Michigan-based company has grown, so has the range of the different types of boats this diving board can be mounted on, including houseboats.
You can install one of these diving boards right at the dock and in hardly any time at all. I know this to be a fact because this is exactly what I did recently with Corey and his wife Ann, who is the president of LilliPad Diving Boards.
I met this couple and their adorable little girl Lily (the namesake behind the LilliPad Diving Board) at the State Dock Marina on Lake Cumberland in Kentucky and we immediately got to work. There are two different ways you can mount the diving board: with an under floor mount or using the surface mount option. While trying to decide which way to showcase the install for the magazine article, we decided to show it both ways using two different houseboats.
Under Floor Mount
If you’re able to get under your deck (no aluminum shield or anything else blocking you), the under floor mount is your best option. It will require two people and a little more time to position it perfectly, but it doesn’t require any additional hardware and it really is a solid way to mount the diving board.
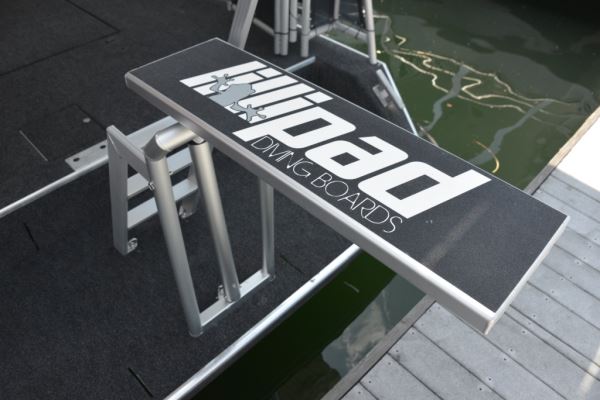
The LilliPad Diving Board comes in three separate pieces and is easy to assemble right out of the box. It also only weighs around 50 pounds, so it’s easy to move around:
.JPG_600.jpg)
Here Corey assembles the pieces together using the provided hardware.
.JPG_600.jpg)
When deciding where to drill the holes, it’s important to position the diving board first to make sure it won’t interfere with anything else on the back deck.
.JPG_600.jpg)
This bracket is designed to go under the deck on the back side so that the eye bolt can secure the diving board.
.JPG_600.jpg)
After attaching the bracket below, Corey tightens it to the deck with the two bolts.
.JPG_600.jpg)
Using the provided eye bolts, the frame is secured to the deck. It can be easily removed when not needed by simply removing the three eye bolts.
.jpg_600.jpg)
Corey positions the handrail and double checks the security of the diving board.
.JPG_600.jpg)

By placing a pin above the shock, the board easily transforms from the down position to the “let’s have some fun” position.

.JPG_600.jpg)
A great feature of this design is the clean look. If you want to remove it for the day or if the boat is ever sold without the board, just remove the three eye bolts and the marks in the carpet are minimal.
.JPG_600.jpg)
Surface Mount
If you’re not able to get see the bottom side of the deck to attach the standard brackets, it’s not a problem. Surface mount brackets are available for an even easier install.
When deciding where to drill the holes for the surface mounts, it’s important to position the diving board first to make sure you get it where you want it:
.jpg_600.jpg)
With the surface plates in place, next using a 1/8-inch bit you drill the holes. When working with different types of flooring, a sharp bit is a must.
.jpg_600.jpg)
Then drill a pilot hole before screwing it to the deck. Always start with the largest plate and secure it first.
.jpg_600.jpg)
Grease is recommended on this step to help secure it to the deck of the houseboat.
.jpg_600.jpg)
Repeat the mounting process with the two other smaller surface plates.
.jpg_600.jpg)
After attaching the surface plates with the provided screws, the diving board now covers the bracket and the eye bolts can now be tightened to secure.
After raising the handrail and securing it with a pin to hold it in position, the board is now ready. The shock has two settings: one for kids under 100 pounds and a stiffer setting for those up to the recommended maximum weight rating of 250 pounds.
.jpg_600.jpg)
The LilliPad provides an energy-canceling diving board specifically designed for mounting on a boat. The downward forces generated by a person jumping on the end of the board are “canceled” by equal and opposite forces within its framework. The result is a spring-action for the jumper and a gentle wave-action for those on the boat. Of course on a large houseboat this is a non-issue. I’ve been fortunate enough to see this diving board in action many times on smaller boats and it always surprises me how minimally the boat rocks when someone jumps off.
With the successful installs now behind us, it was time to try it myself. That’s right, the big guy took the plunge (multiple times) and even though I’m easily a biscuit over the recommend max weight limit of 250 pounds, the LilliPad Diving Board held up just fine.